
Introduction
Welcome to the first project in my Crochet Basics for Beginners Series!!
When I first started learning how to crochet, I quickly became quite overwhelmed trying to learn all the stitches required in a basic ‘beginner friendly’ pattern. I struggled to find anything that started right from the beginning such as how to hold your hook or yarn! So I decided to do things differently here, I wanted to create a series that started right at the beginning and provided easy to follow demos and instructions without all the distractions . A series that progressed simply and slowly through each learning curve, giving you time to practice what you had learned before moving on to the next stage while making something usable!
Project Overview
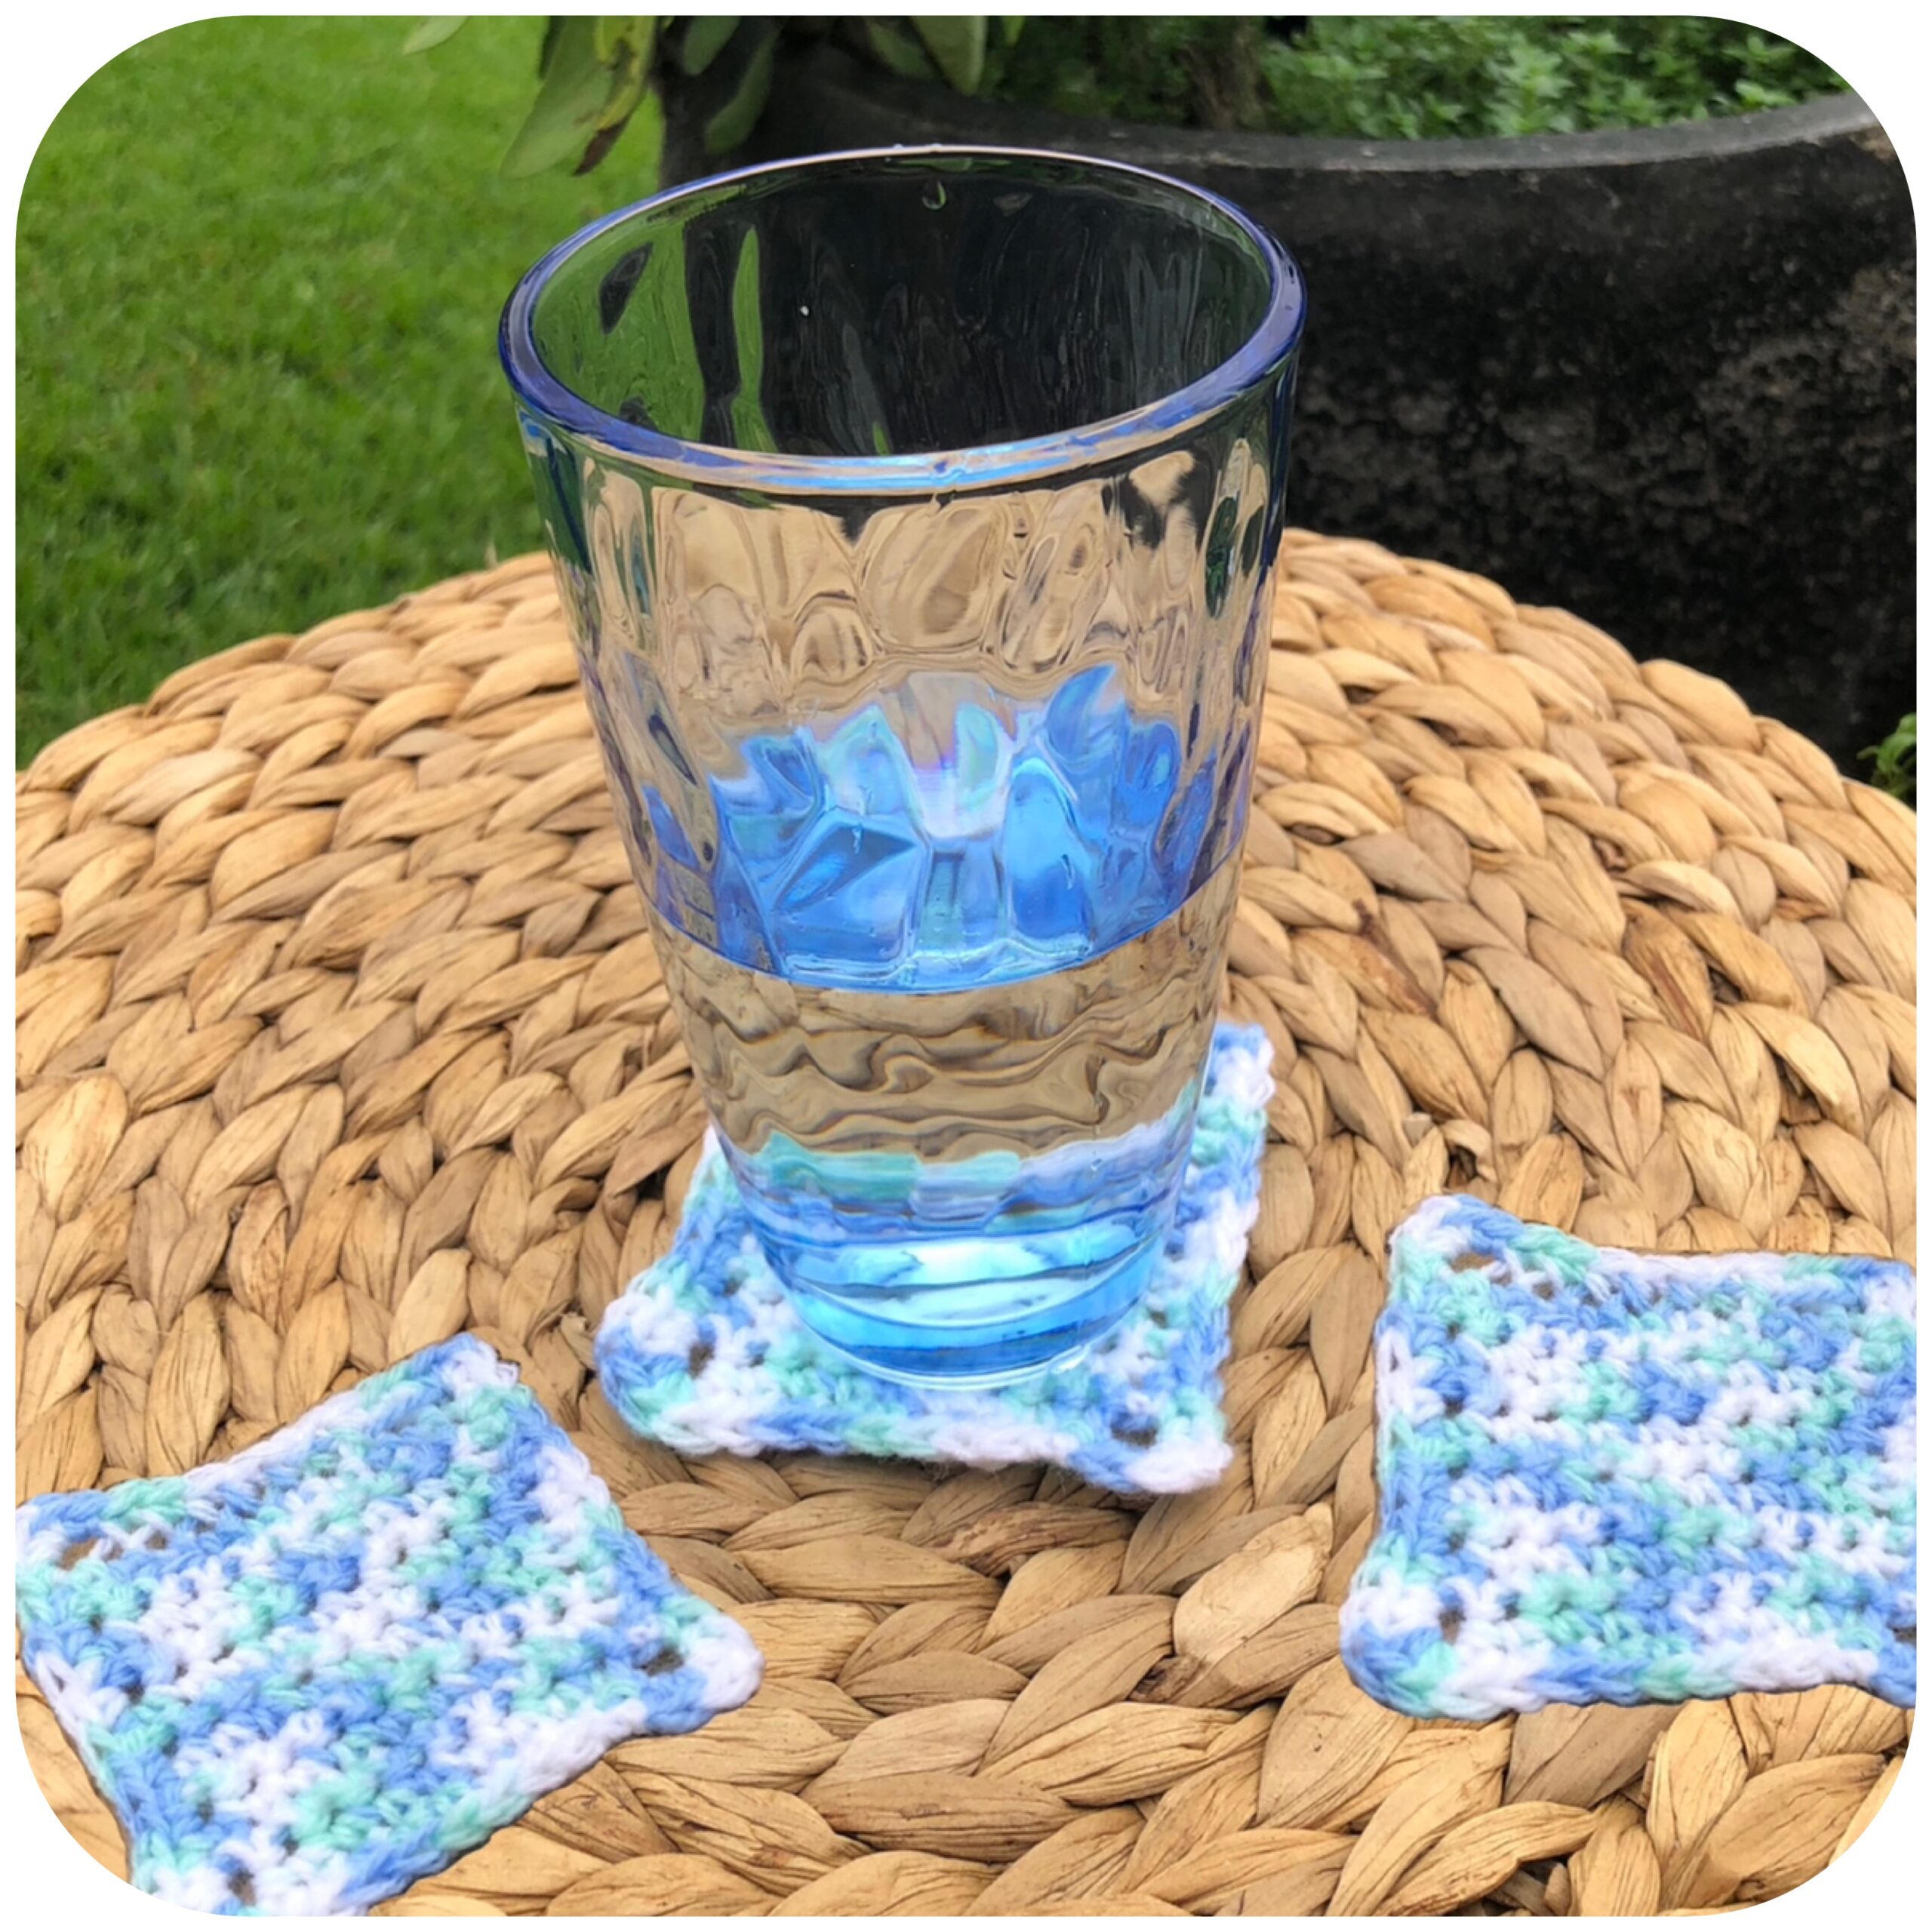
So in this first project, I’ll take you step-by-step through how to create a simple and beautiful drink coaster. It will give you a chance to practice and become more confident with your single crochet stitches. I’ll also show you how to create a neat single crochet edge around your work to give it that finishing touch! Here’s a list of things you’ll get to learn and practice in this project:
- slip knotting yarn onto your hook – if you would like help with this click here
- holding your hook – if you would like help with this click here
- holding your yarn – if you would like help with this click here
- making a chain stitch (ch) – if you would like help with this click here
- making a single crochet stitch (sc) – if you would like help with this click here
- making a slip stitch (sl st) – if you would like help with this click here
- edging around your piece to give it a neat finish
- making a corner within your edging (sc2, ch1, sc2)
- fastening off (fo)
- weaving in your ends
There are simple step-by-step instructions with clear photos, as well as a video demo further down the post showing the entire project being made, so if you get stuck or just prefer video demonstrations, head down the page to watch.
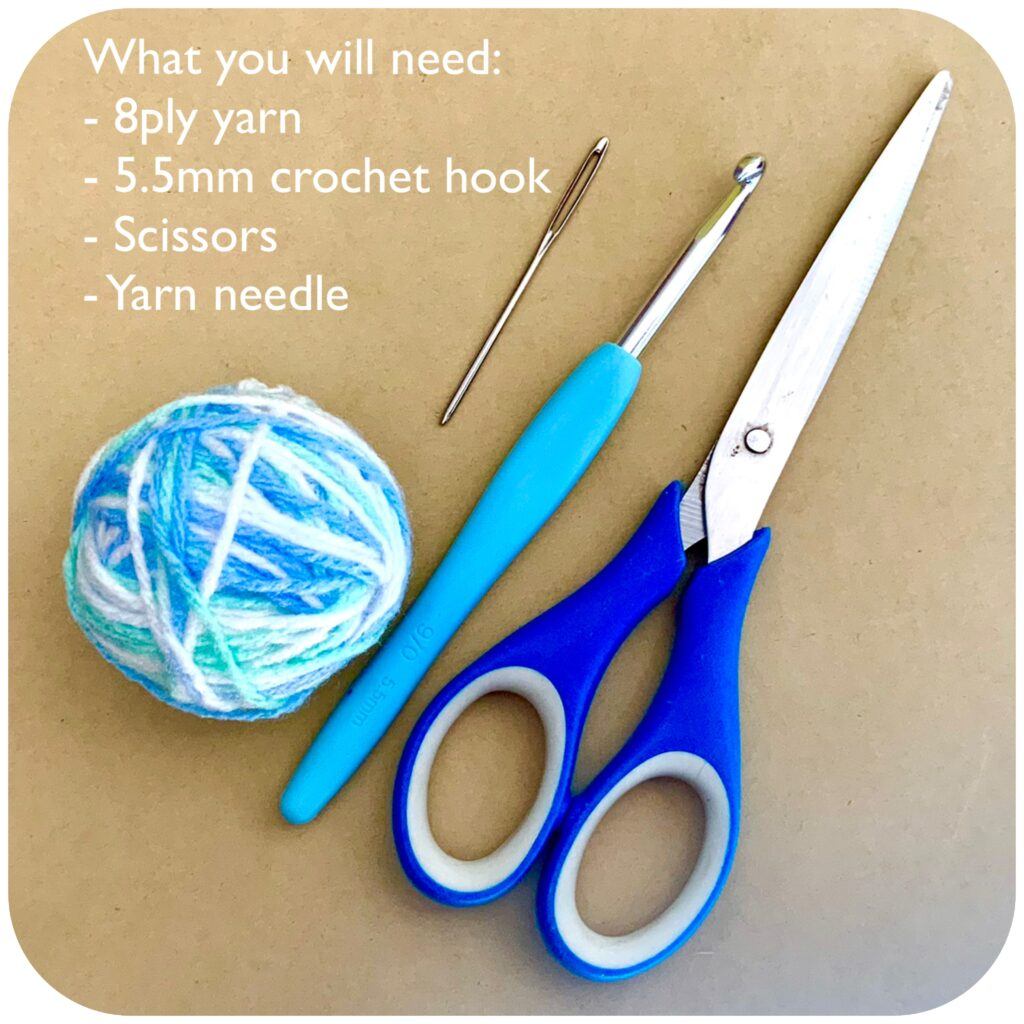
What You Will Need
- 8ply yarn – equivalent yarns in other countries could be a DK yarn, light worsted yarn, medium-weight yarn.
- 5.5mm crochet hook – equivalent to a US I/9 or UK5
- scissors
- yarn needle
Hook, yarn, and link! When you click and buy through our links, you’re not just crafting amazing projects, you’re helping us stitch together more fabulous free crochet content. It doesn’t cost you extra, but it keeps our hooks moving and your patterns plenty!
Abbreviations Used
- ch = chain stitch
- sc = single crochet stitch
- sl st = slip stitch
- sc2 = two single crochet into the same stitch
- ( ) = work instructions in brackets as directed after or before brackets
You can find a full list of abbreviations used in crochet patterns here.
Let’s Begin the Coaster Base
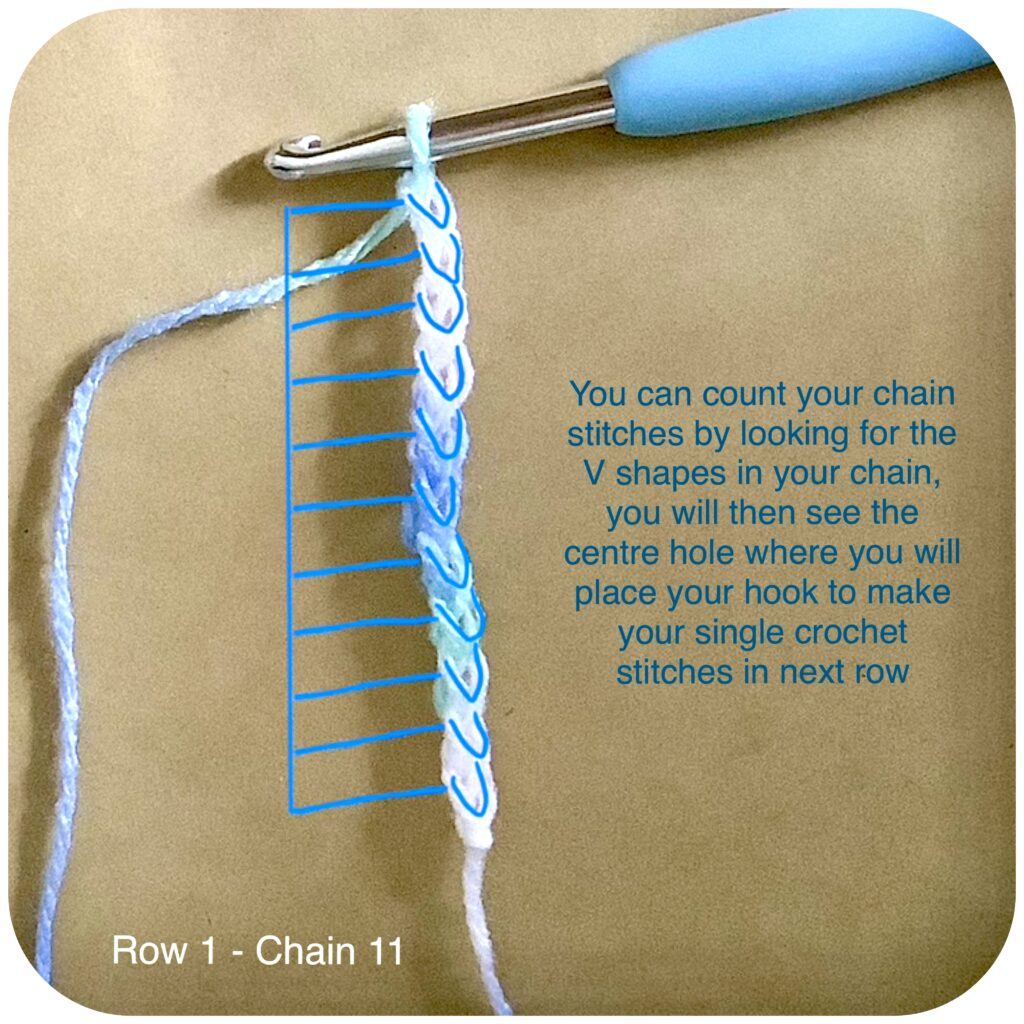
Row 1 – Chain 11
This photo shows what your foundation chain of 11 chain stitches will look like. It also shows how to recognise each chain stitch by finding the V and then seeing the centre hole which is where you’ll place your hook to make single crochet stitches in row 2.
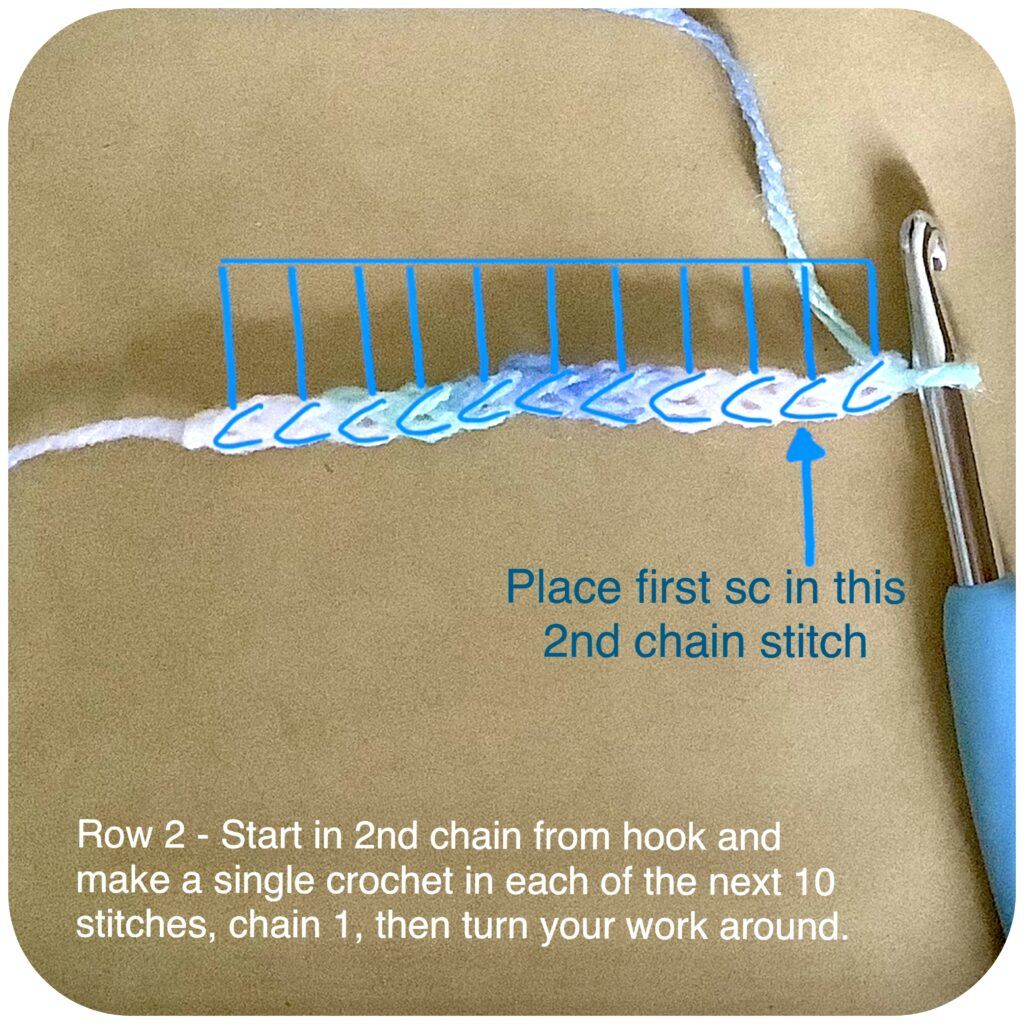
Row 2 – Start in the 2nd chain from your hook and make a single crochet in each of the next 10 stitches, chain 1, then turn your work around.
This photo shows you where the 2nd chain from hook is to start your first single crochet stitch and where each of the other nine single crochets stitches will go as you work along your row to the end.
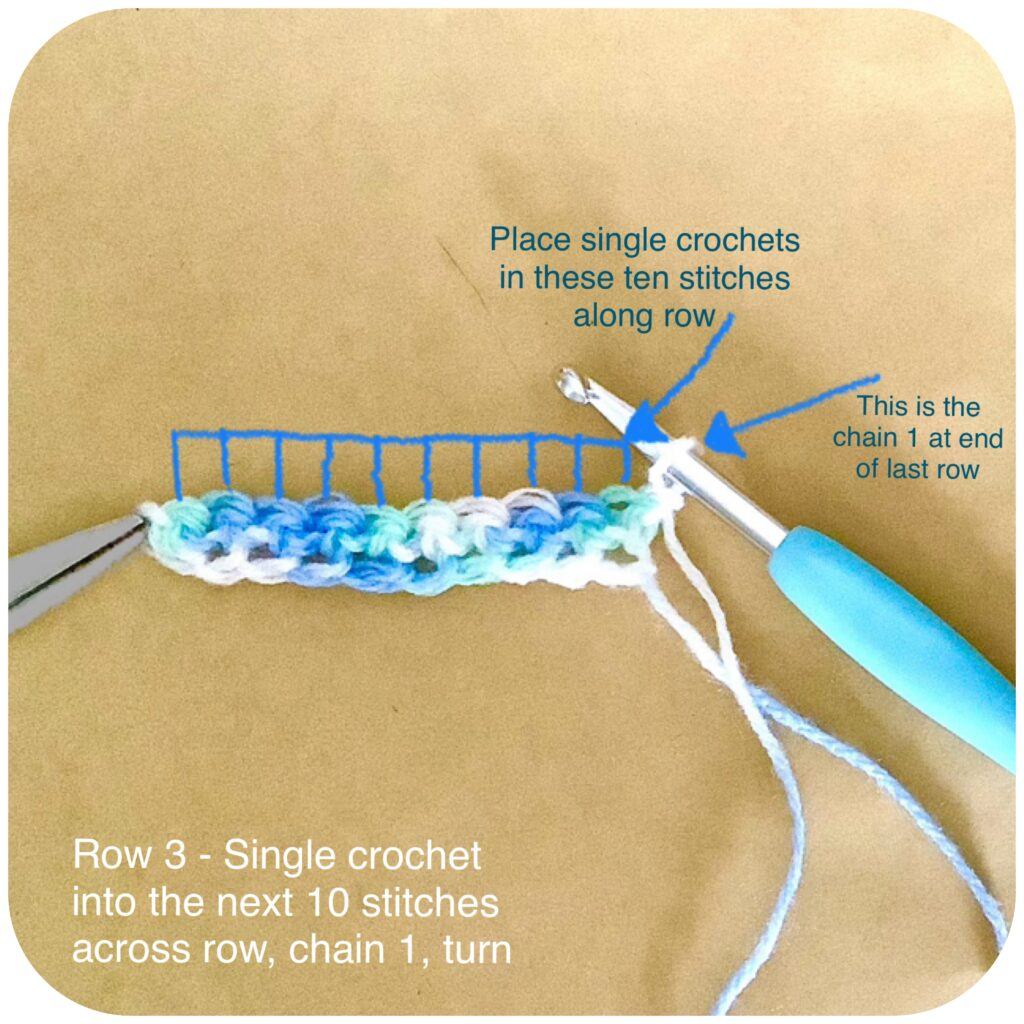
Row 3 – Single crochet into the next 10 stitches across the row, chain 1, turn.
This photo shows your work turned around after completing row 2. It also shows where the last chain stitch in row 2 is and where to place each of the next 10 single crochet stitches for row 3.
How to find and count your stitches from both sides of your work as you go
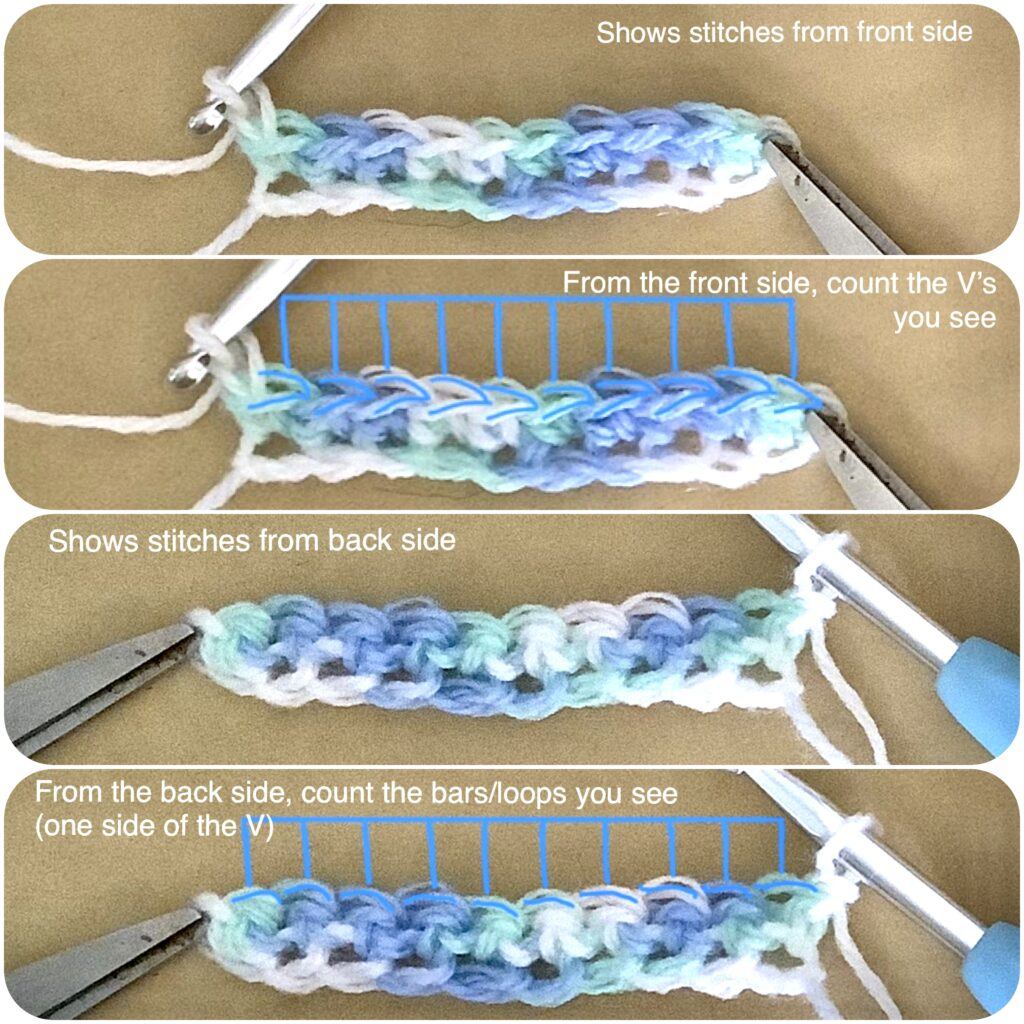
From the Front Side (Right Side):
- Identify the V-shapes: Each single crochet stitch looks like a “V” on the front side of your work.
- Start from the edge: Begin at one edge of your row or round.
- Count the Vs: Move across the row or round, counting each “V” shape you see as one single crochet stitch.
From the Back Side (Wrong Side):
- Identify the horizontal bars: On the back side, single crochet stitches resemble a series of horizontal bars.
- Start from the edge: Just like with the front side, start counting from one edge of your row or round.
- Count the bars: Move across the row or round, counting each horizontal bar as one single crochet stitch.
Tips for Accurate Counting
- Mark the first stitch: Use a stitch marker in the first stitch of the row or round to easily identify where to start and end.
- Work in good light: Ensure you have adequate lighting to clearly see each stitch.
- Take your time: Carefully count each stitch, especially if you’re new to crocheting.
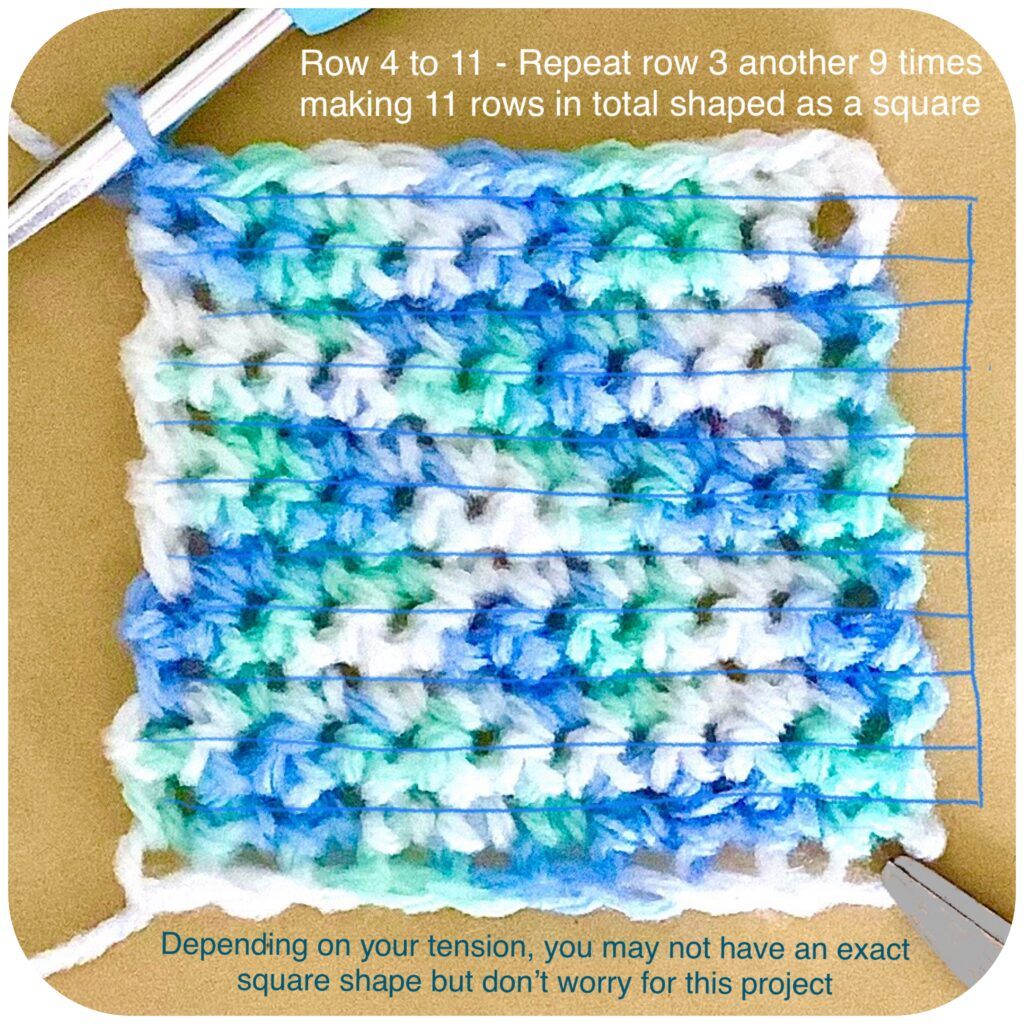
Rows 4 to 11 – Repeat row 3 another 9 times – making 11 rows in total. Your work should be a squarish shape. For this project, it doesn’t really matter if it isn’t; just keep going, and you’ll get some cool rectangle coasters instead!
This photo shows the squarish base of the coaster after completing rows 4 to 11. You’ll see that the blue lines indicate where each row is .
Let’s Begin Edging Around Outside of Coaster Base
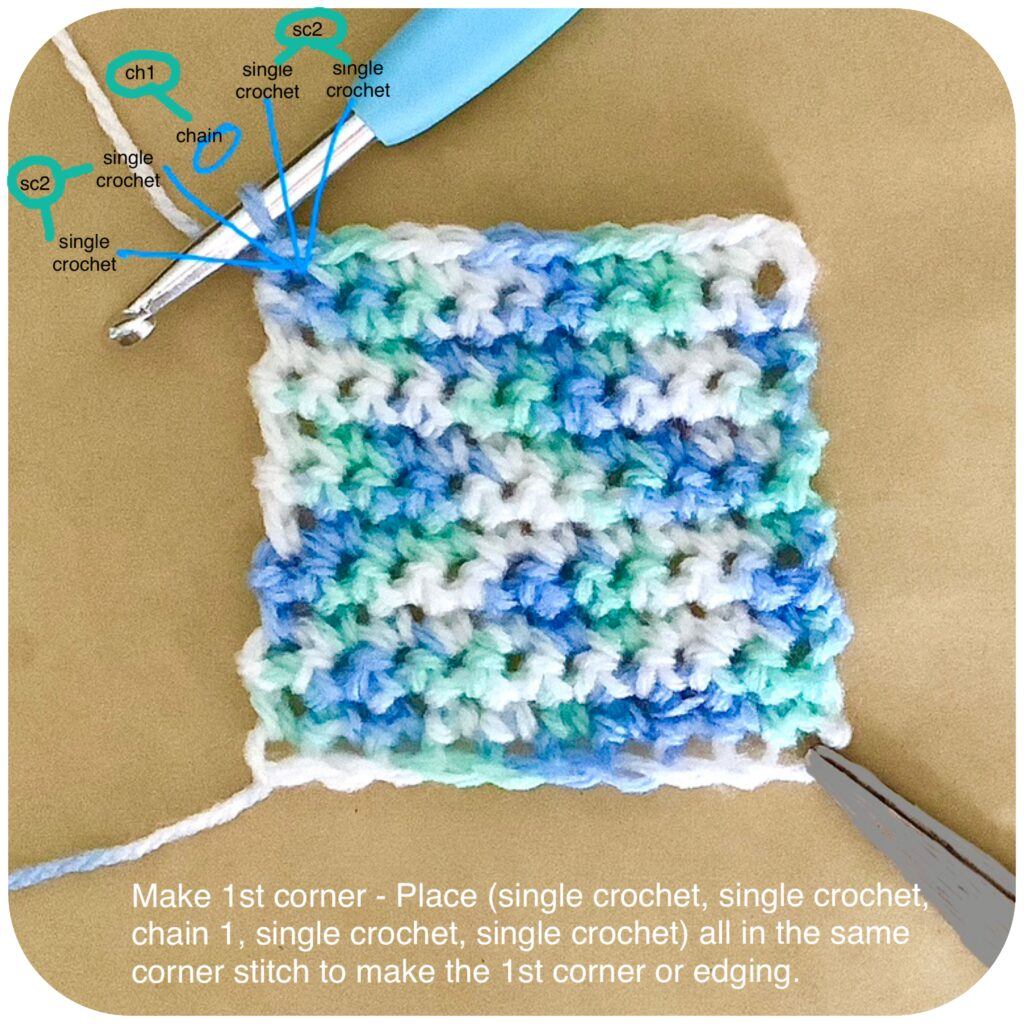
Make 1st Corner – Place (single crochet, single crochet, chain 1, single crochet, single crochet) all into the same corner stitch to make the 1st corner of edging.
NB: In a pattern, the (single crochet, single crochet, chain 1, single crochet, single crochet) would be shortened to (sc2, ch1, sc2). Parentheses are used to indicate a group of stitches that are to be worked together into the same stitch
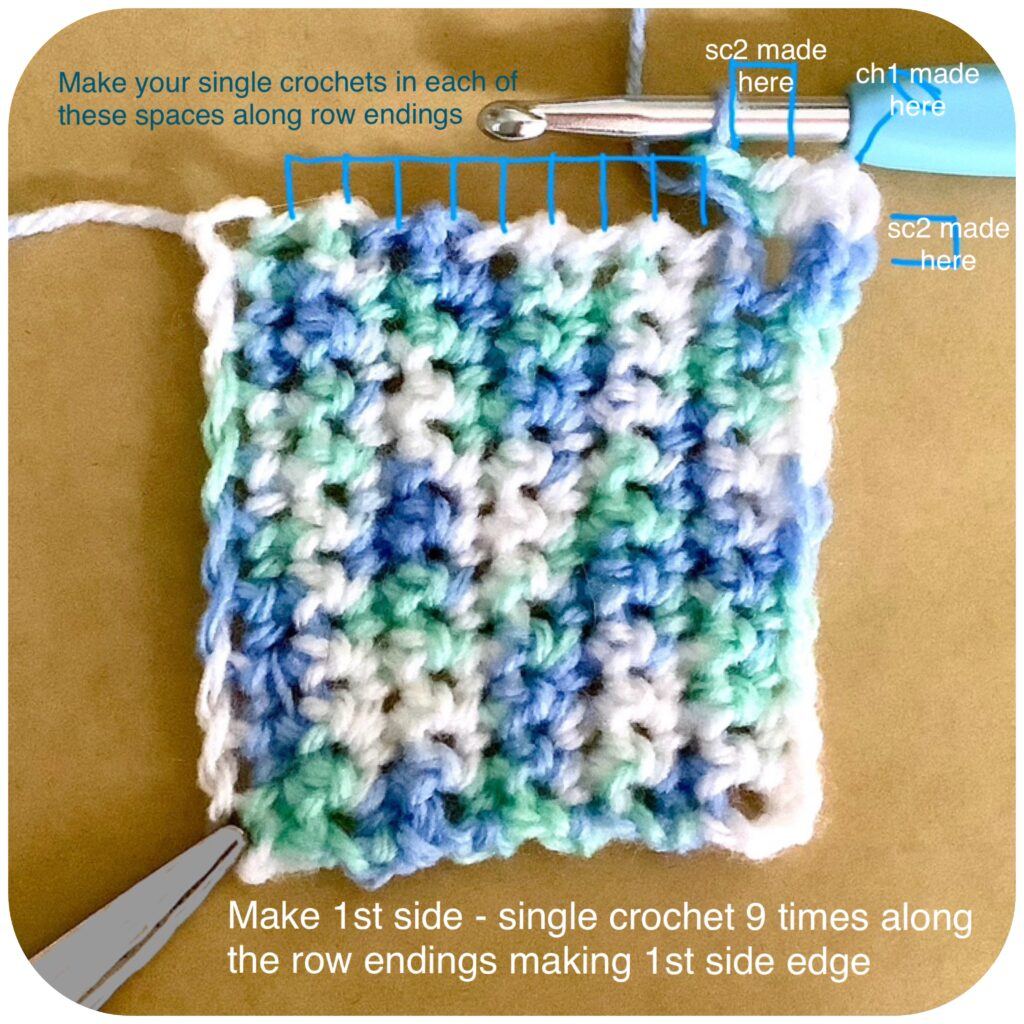
Make 1st Side – Single crochet 9 times along the row endings, making the first side edge.
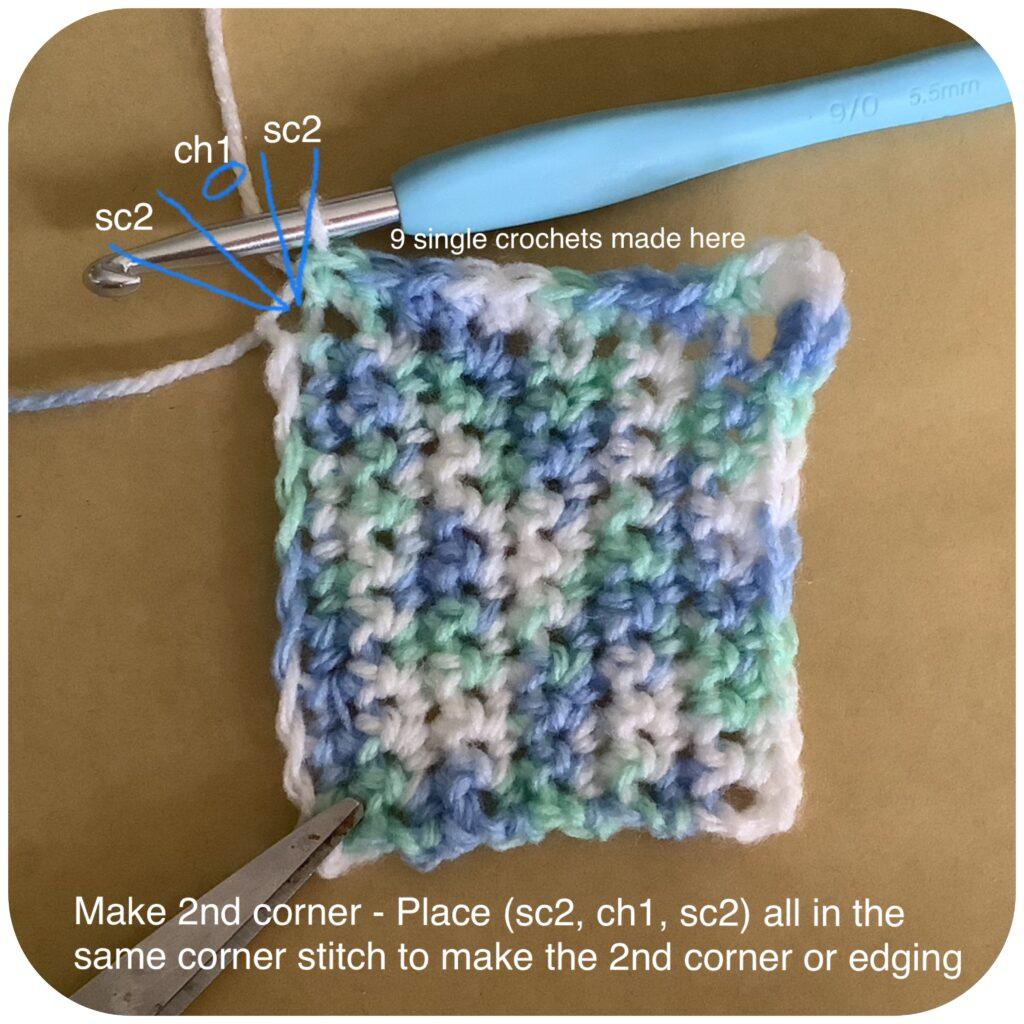
Make 2nd Corner – Place (sc2, ch1, sc2) all in the same corner stitch to make the 2nd corner of edging.
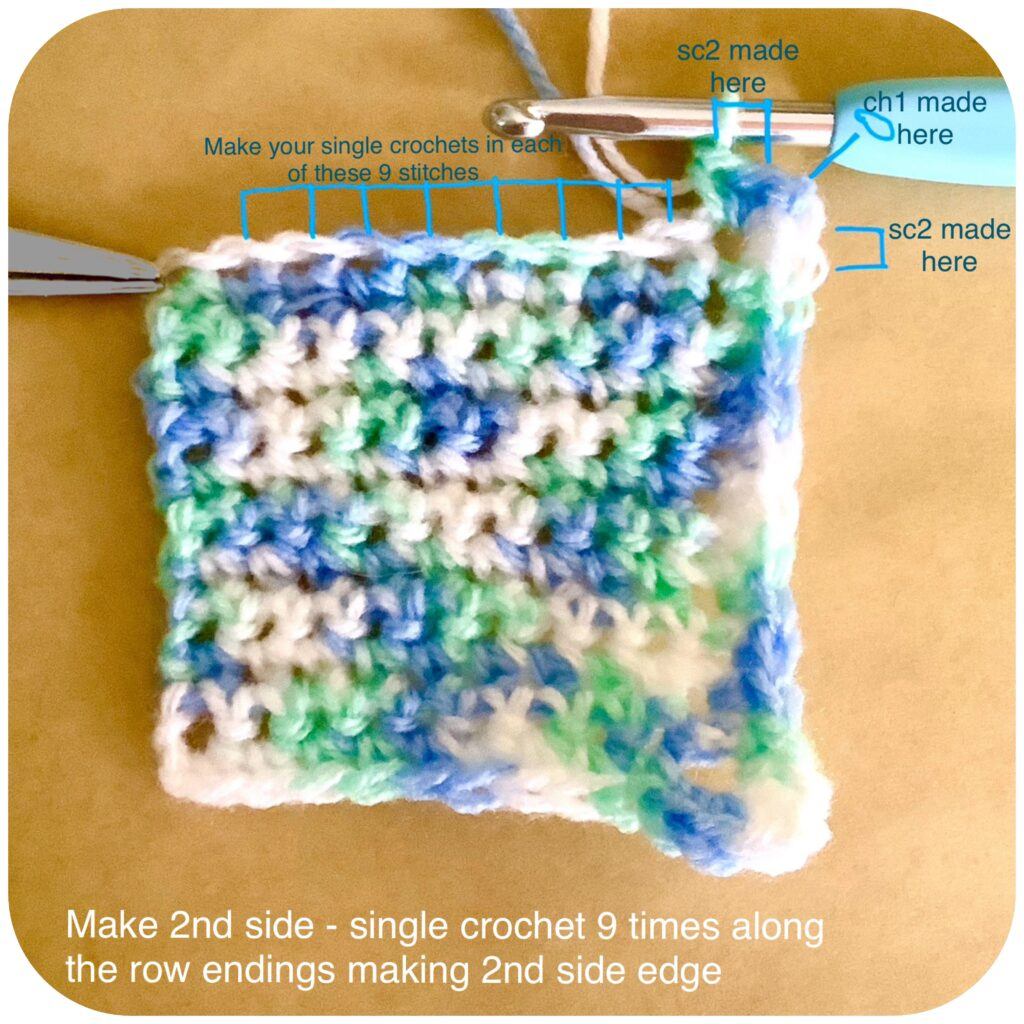
Make 2nd Side – Single crochet 9 times along the row endings, making the second side edge.
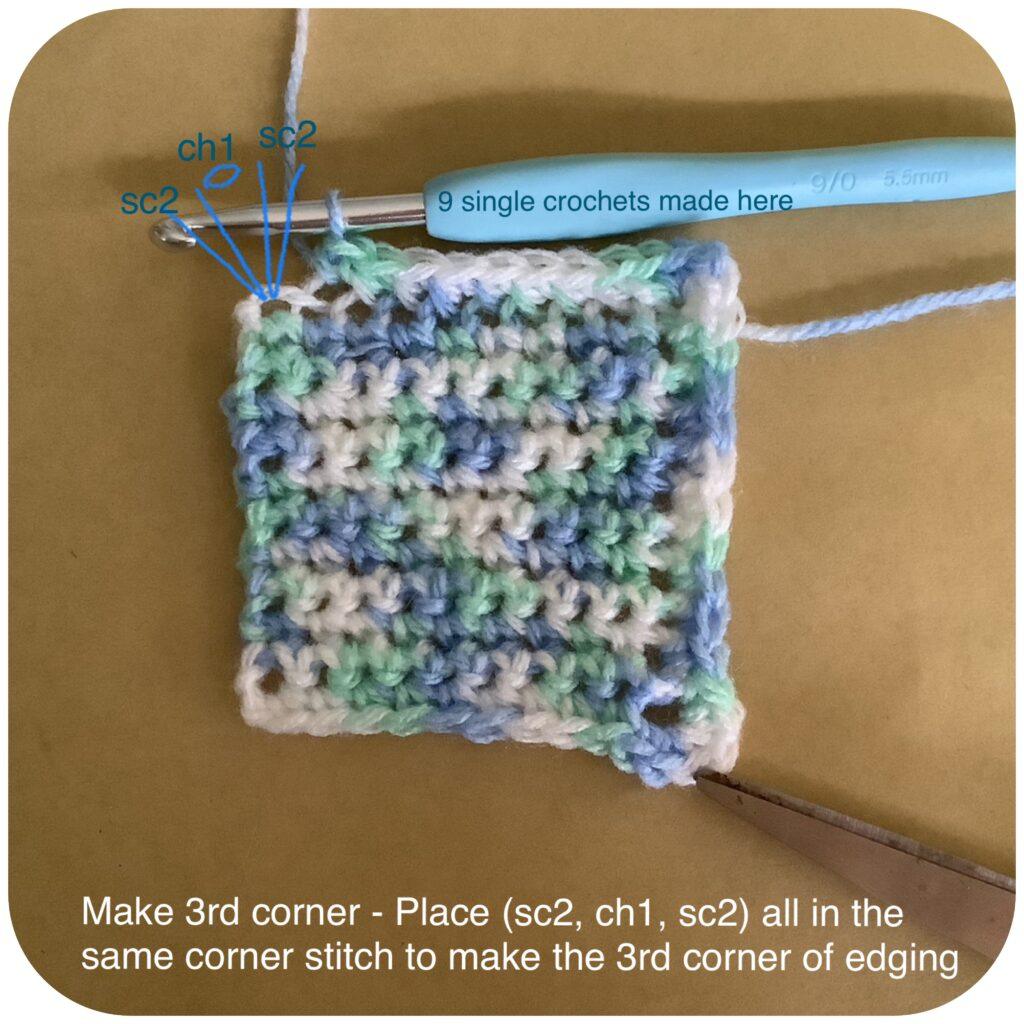
Make 3rd Corner – Place (sc2, ch1, sc2) all in the same corner stitch to make the 3rd corner of edging.
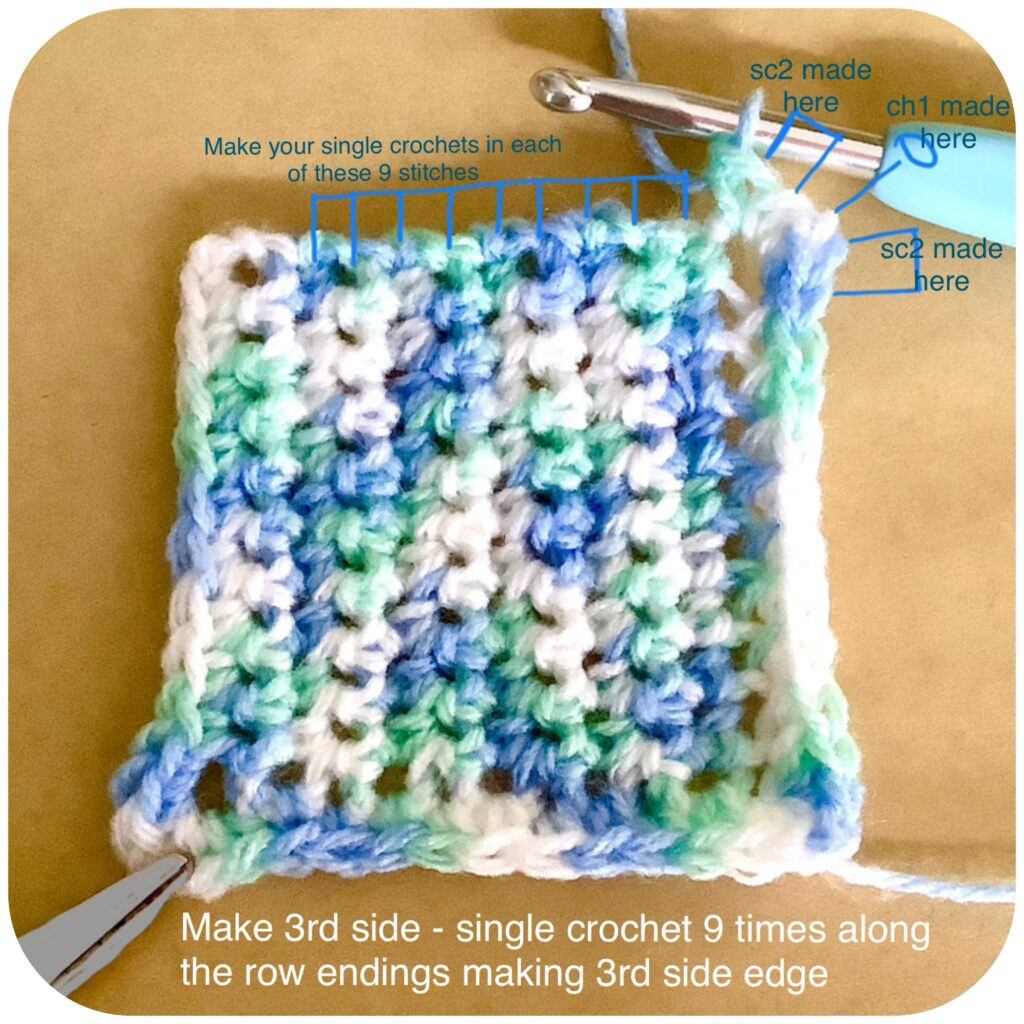
Make 3rd Side– Single crochet 9 times along the row endings, making the third side edge.
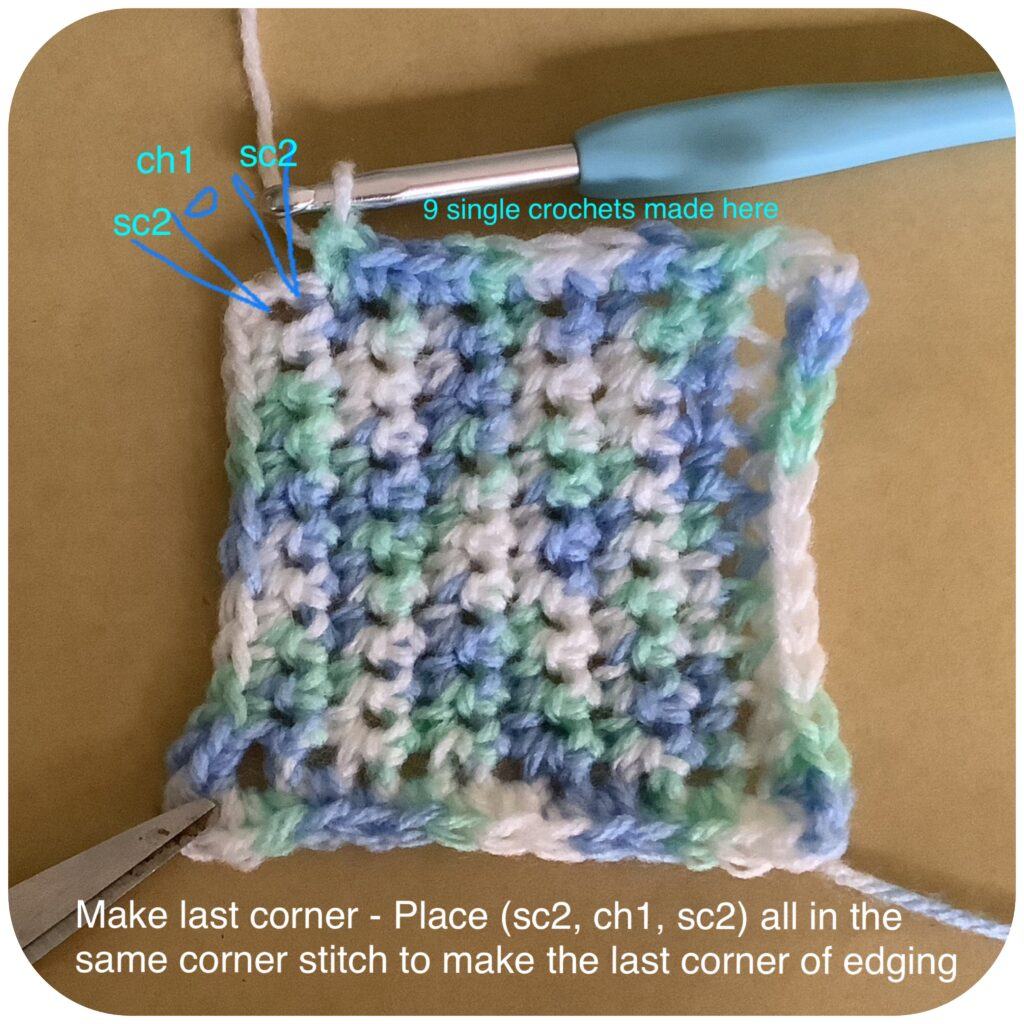
Make Last Corner – Place (sc2, ch1, sc2) all in the same corner stitch to make the last corner of edging.
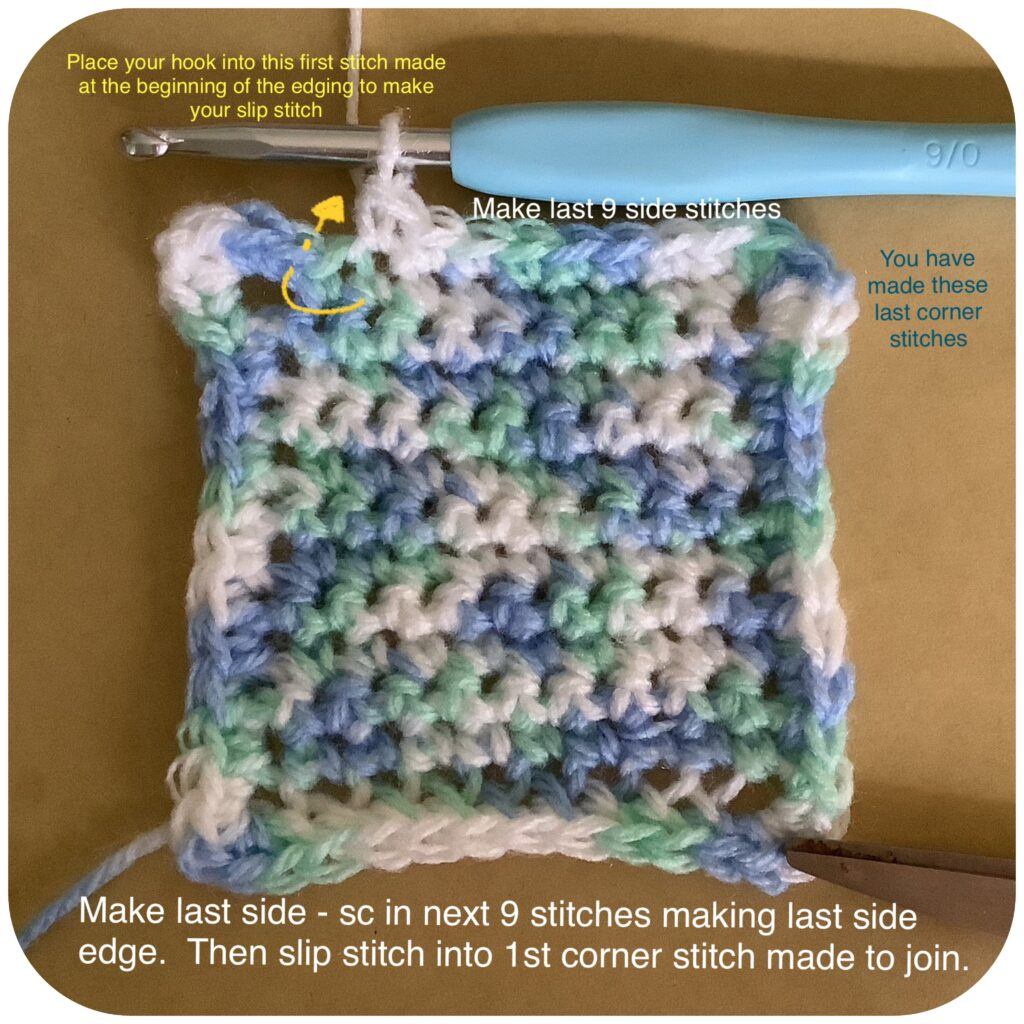
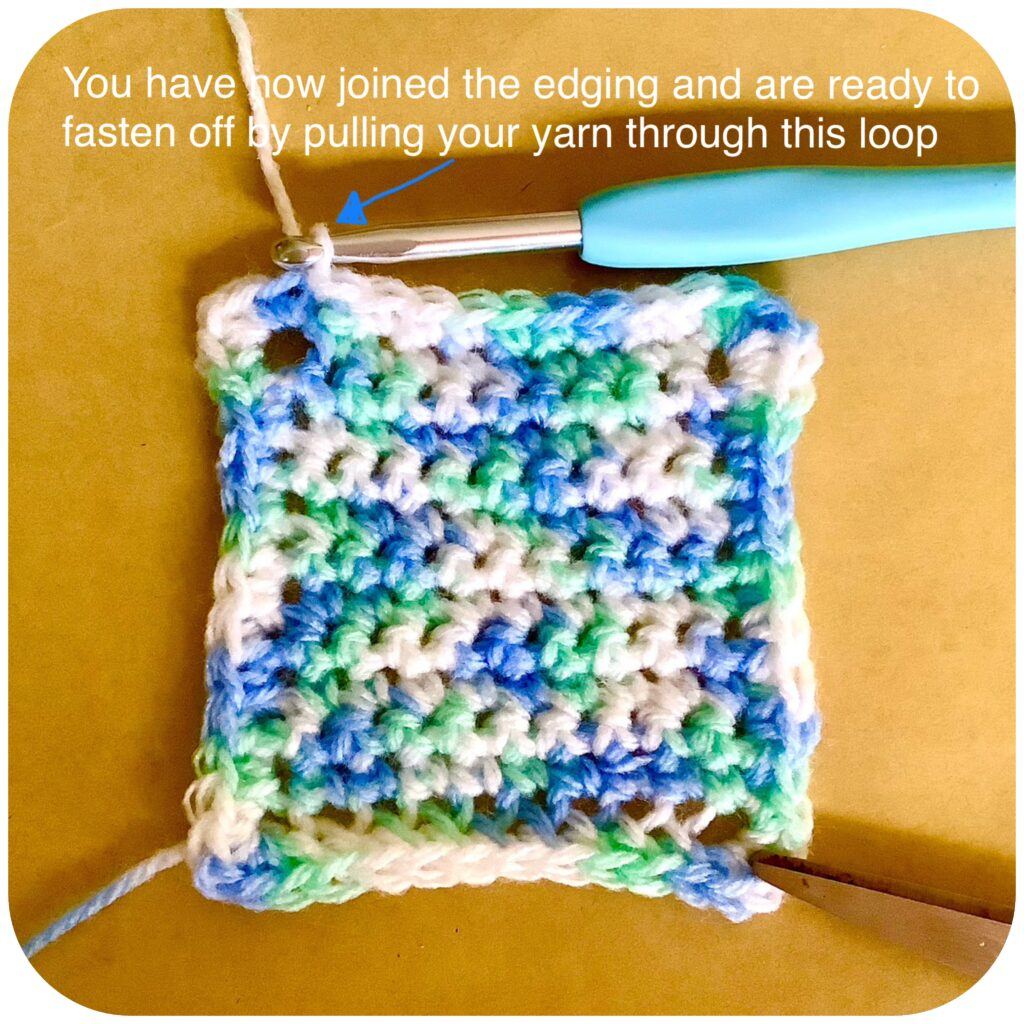
Make Last Side – Single crochet in the next 9 stitches, making the last side edge. Then slip stitch into the 1st corner stitch made to join.
Let’s Finish Coaster Off
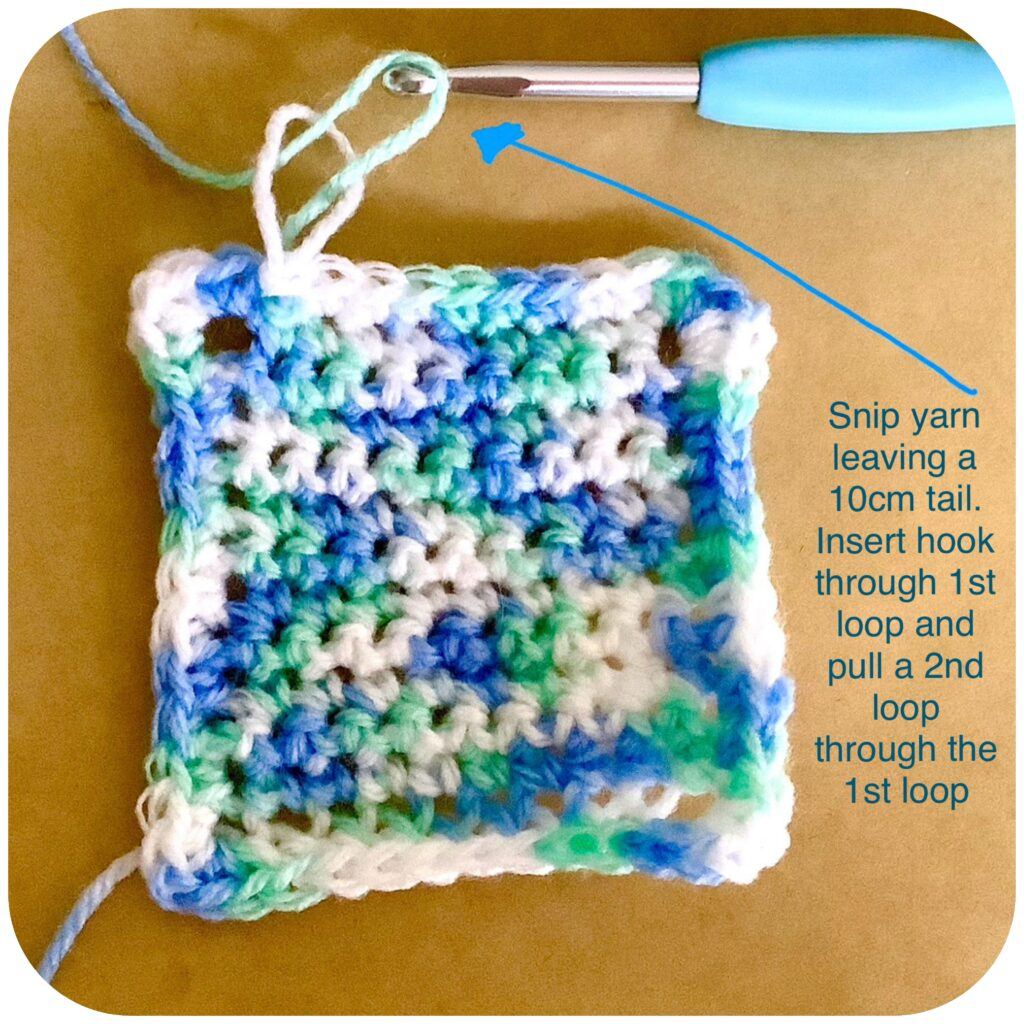
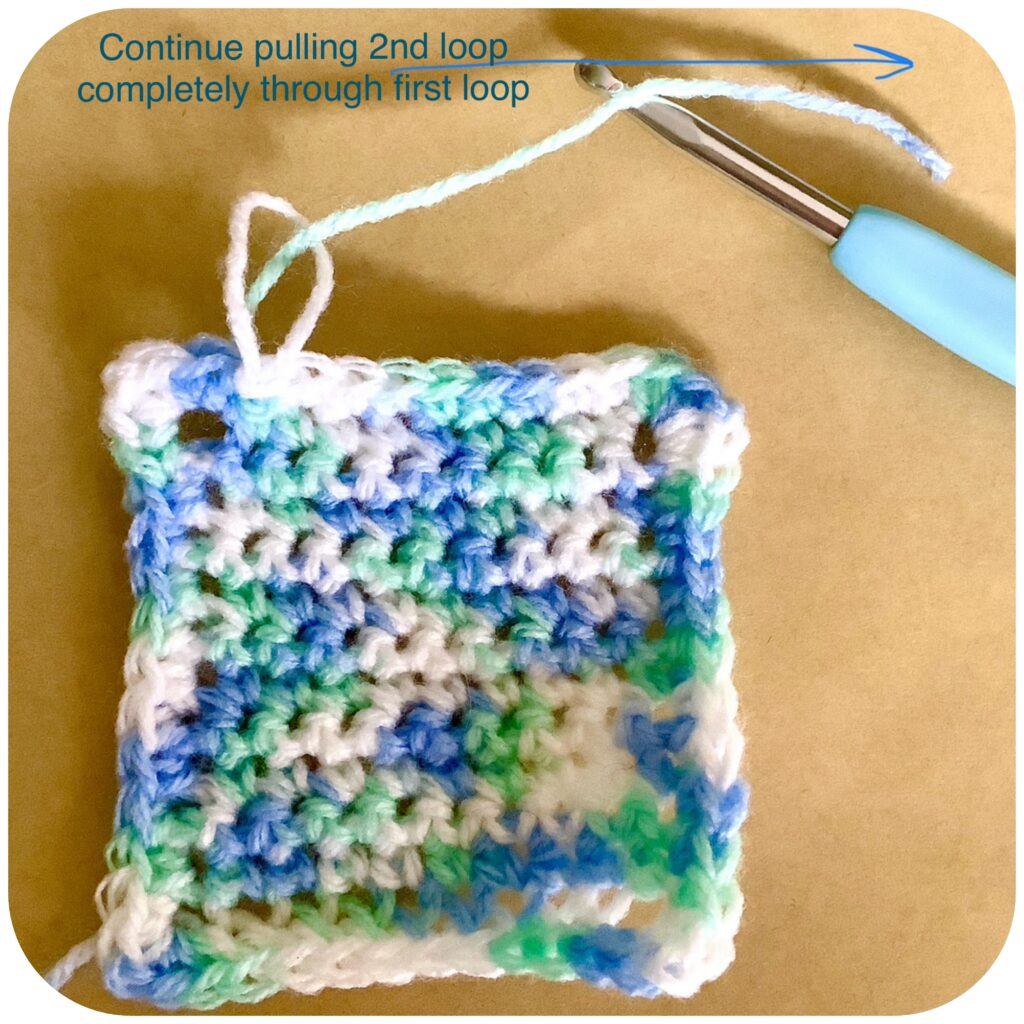
Fasten off your work by pulling your yarn through the loop on your hook.

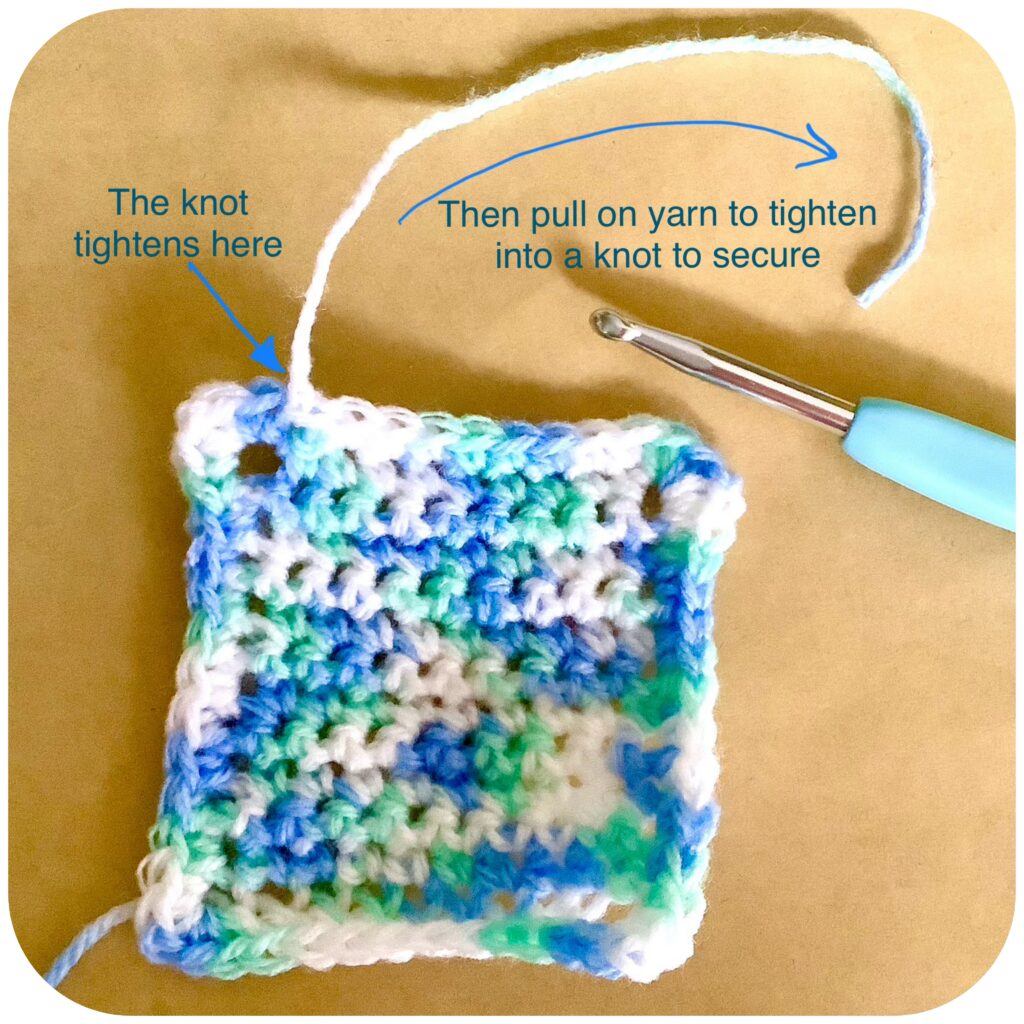
Weave in the ends using a yarn needle.
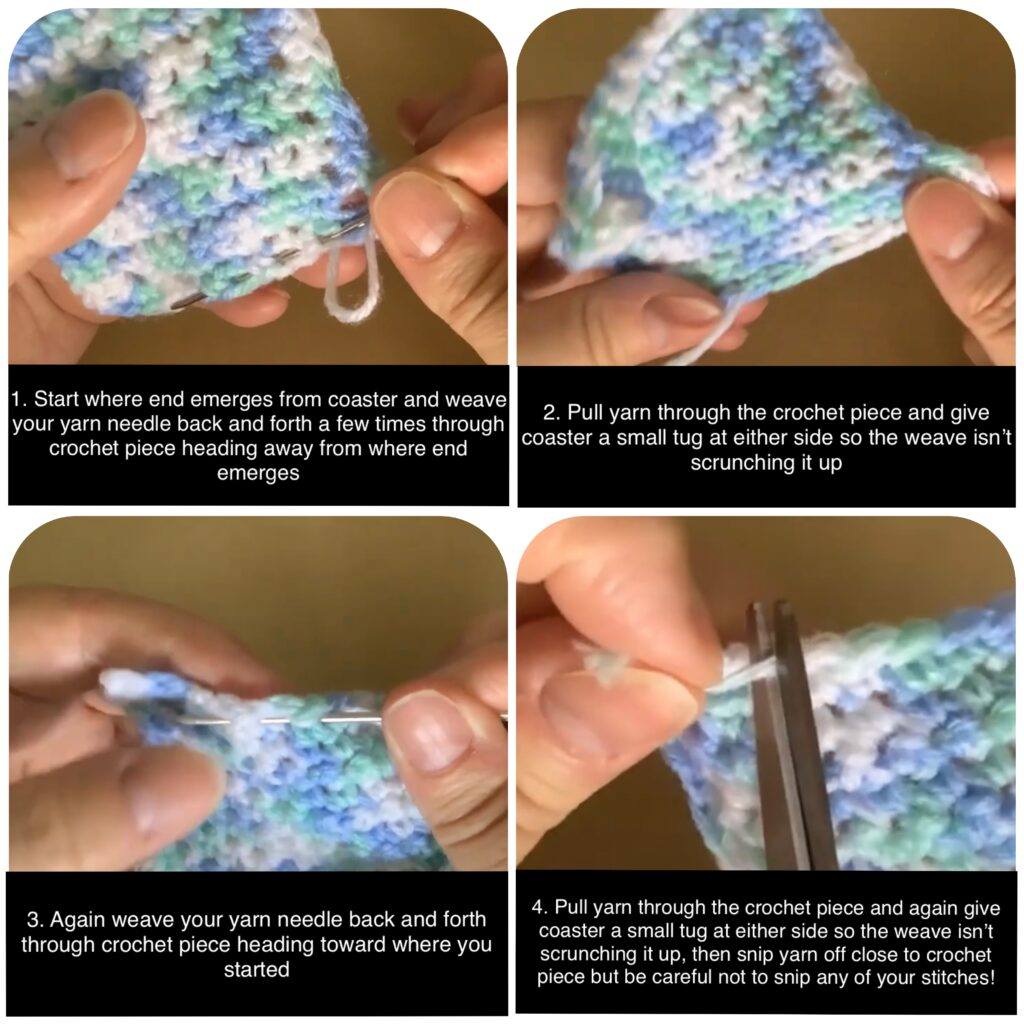
Here’s a quick and simple video demo showing how to easily weave your ends in.
Quick Reference Crochet Coaster Pattern
Materials
- 8 Ply Yarn
- 5.5mm Hook
- Scissors
- Yarn Needle
Abbreviations
- ch = chain
- sc = single crochet
- sl st = slip stitch
- ( ) = work instructions within brackets in the same stitch
Pattern Instructions
Base:
Row 1: Ch 11.
Row 2: Sc in 2nd ch from hook and in next 9 ch, ch 1, turn.
Rows 3-11: Sc in each st across, ch 1, turn.
Edging:
Corner: [sc2, ch1, sc2] in corner st.
Sides: Sc9 evenly along each side.
Repeat corners and sides around.
Join with sl st to first corner.
Finish:
Fasten off and weave in ends.
Make more if you would like a full set
Here is a Full Video Demo of Entire Coaster Project From Start to Finish
By following this pattern, you’ll have a beautiful coaster to use or gift, and you’ll have practiced some essential crochet skills.


Leave a Reply